Are you kids crazy about making crafts? My daughter always was and the holidays were a time when she was pretty much desperate to craft all the time. (I wonder who she got that from?) Of course, I was always testing ideas for my art lessons at school too so it was a win-win situation for both of us. This simple paper cascade Christmas ornament was a favorite of ours!

It’s really simple to make, pretty, and a bit unique. But it’s also a fantastic way to use up those awkward leftover bits of wrapping paper that you don’t want to throw away but don’t know what to do with. And you can even turn these ornaments into simple gifts or party favors by filling them with candy or other treats!
Welcome to Day 6 of the Fourth Annual 12 Days of Christmas Series!

We have teamed up with 50 plus bloggers to bring you a oodles of DIY Ideas and Recipes to make your holiday season merrier. There are 12 different posts in the series and we have spread them out over a four week period with three posts per week. Now is the time to subscribe!
It’s Day 6 and we are sharing DIY Ornament Ideas!

HOW TO MAKE A PAPER CASCADE CHRISTMAS ORNAMENT
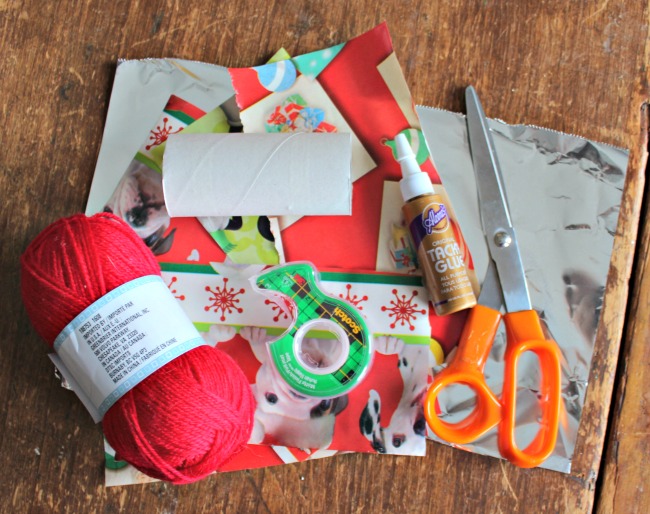
Materials Needed:
Scraps of paper – wrapping paper works well here. I find that the inexpensive paper (like from the dollar store) drapes the best and hangs down into a cascade better than the thicker, more expensive wrapping paper. I also made one with a metallic Mylar type of paper (scroll down for photo). I’ve made these before using tissue paper as well with great results but I found that kids had more difficulty working with it.
Scissors
Scotch tape and/or glue. The glue gives longer lasting results but I found that having tape on hand was very helpful. Some kids found the glue frustrating to work with.
A paper tube
Aluminum foil
Yarn or ribbon or string for hanging the finished ornament
Tissue paper – only needed if you’re planning on using this as a candy holder
Step by Step Instructions

1. Begin by covering the paper tube with the foil. Tuck in the ends. You could also use some kind of plain paper but the kids found it easier to use foil.
2. Cut pieces of paper to desired size. Mine were 3 X 6 inches. You need to make sure that they will wrap all the way around the paper tube. Other than that, it’s up to you to decide how much of a fringe you want. Once you have your pieces of paper cut to size, start fringing along one of the long sides.
3. Cut slits – I find the closer together they are, the more they hang down into a cascade effect. Be sure not to cut all the way across. Leave an edge of about 1/3 to 1/2 inch uncut.
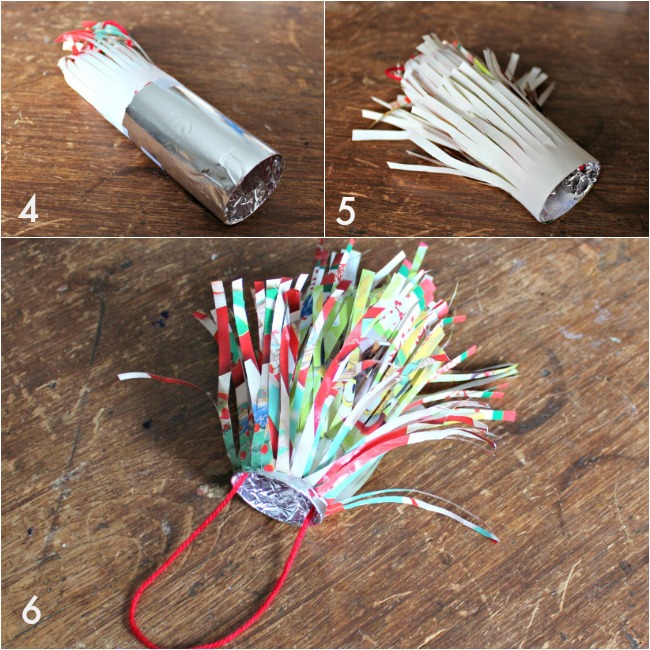
4. Start at one end of the tube and begin attaching the fringed pieces of paper as show. Remember that you are attaching them wrong side out!
5. Continue attaching more pieces of paper, layering them on top of each other. To get the effect shown here, I used 4 pieces of paper. You can use more or less as desired.
Bonus: If you want to use this as a candy holder, stuff a piece of crumpled up tissue paper into the bottom of the tube. Use tape to secure it in place. I find it easiest to do this before adding the final layers of fringed paper but it can be done at the very end if preferred.
6. Flip the tube upside down so that the right side of the paper falls down into a cascade. You might have to play with it a bit to get it to lay the way you want it. Start with your fingers and then if you want some of the more stubborn pieces to hang down more, I find that gently rolling it a little bit around a pen or pencil helps. Attach a piece of yarn or something similar as an ornament hanger. I used tape to secure mine inside the tube.

Scroll down for many more DIY Ornament Ideas for your holiday season!
Last time, we shared ideas for holiday party foods. You can find my yummy baked macaroni and cheese appetizer bites here.
Marie InteriorFrugalista says
My daughter was the same way and she has kept that tradition as an adult. Every year I get a handmade gift from her and I cherish them. My kids used to make these too but didn’t slice the paper as thin – I’m liking this version.
Super Mom - No Cape! says
That metalic one would be awesome to use for New Year’s decor!
Beverly says
What a fun ornament idea to make with children. I especially love the metallic one.
Jenny says
Love this idea! My kids love to craft too and this would be so easy & fun to make