• Nav Social Menu

    • Amazon
    • Bluesky
    • Etsy
    • Facebook
    • Instagram
    • Pinterest
    • Threads
    • YouTube

Creative Cynchronicity

  • Home
  • CELEBRATE
    • 4th of July
    • Advent
    • April Fool’s Day
    • Autumn
    • Back to School
    • Canada Day
    • Christmas
    • Cinco de Mayo
    • Dr. Seuss’ Birthday
    • Earth Day
    • Easter
    • Family Day
    • Father’s Day
    • Football Friday
    • Halloween
      • Candy Corn
    • Shark Week
    • Spring
    • St. Patrick’s Day
    • Star Wars Day
      • Star Wars
    • Summer
    • Valentine’s Day
    • Veterans Day
    • Victoria Day
  • COOK
    • 30 Minute Meals
    • Appetizers
    • Apples
    • Barbecue
    • Beef
    • Beverages
    • Breads
    • Breakfast ideas
    • brown bag lunch
    • Burgers
    • Canadian recipes
    • Canning
    • Casseroles
    • Charcuterie Boards/Party Trays
    • Cheese
    • Chicken
    • Cookies
    • Cranberries
    • Desserts
    • Egg recipes
    • Fish and Seafood
    • Food on a Stick
    • Menu Plans
    • Side dishes
    • Slow Cooker
    • Snacks
    • Soups and stews
    • Turkey
  • CREATE
    • Artist Trading Cards (ATCs)
    • DIY Gifts
    • duct tape
    • Fabric Art
    • paper art
    • Teacher Gifts
    • Teen Crafts
  • SHOP
  • ABOUT CYN & CREATIVE CYNCHRONICITY
  • Get in Touch!
You are here: Home / CELEBRATE / DIY Paper Nutcracker Soldier

December 6, 2025 By Cyn Gagen 4 Comments

DIY Paper Nutcracker Soldier

Filed Under: CELEBRATE, Christmas, CREATE, Kids' Crafts, paper art

To say that I collect nutcrackers would be an understatement. I have over 100 of them. It all started when my dad took me to the ballet and I became immediately enchanted.

It’s one of the things I shared with my students at the beginning of each new school year as we got to know each other. And each Christmas, each student would make their own paper nutcracker soldier.

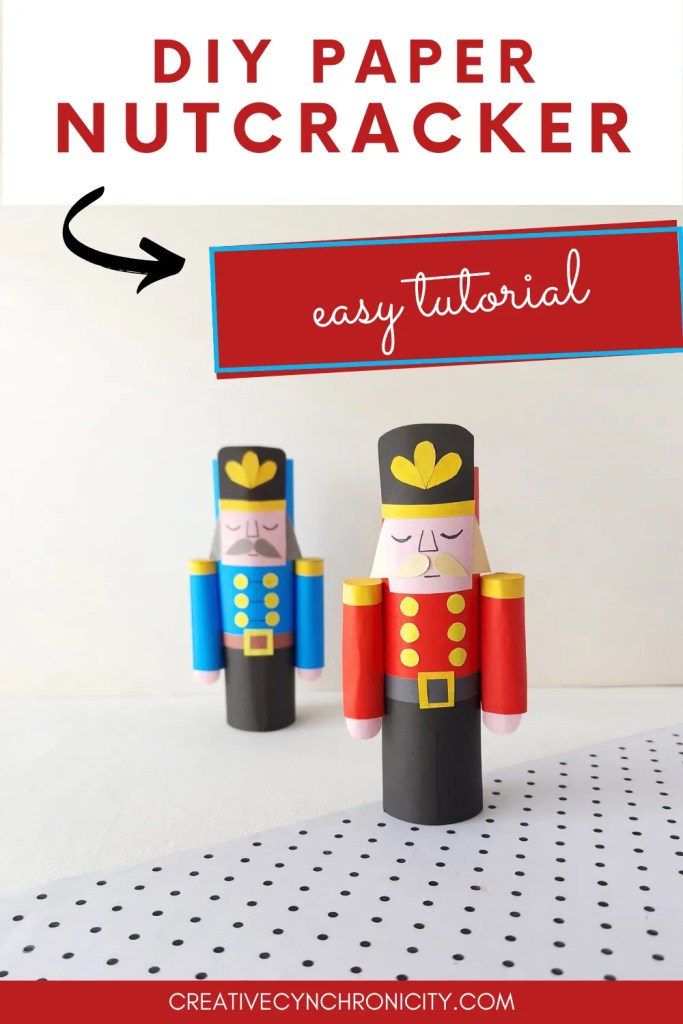
Now I want to share that joy with you! Keep reading for a simple DIY paper nutcracker soldier tutorial. It’s an economical Christmas craft to make with a group or in a classroom too.

Pinterest graphic featuring two paper nutcracker crafts in red and blue uniforms with the text “Paper Nutcracker” on a red banner.

DIY Paper Nutcracker Soldier

Materials needed:

Assorted red, black, pink, yellow, and beige paper pieces arranged on a white background for a DIY paper nutcracker craft.

Construction paper –

You can use whatever colors you want but you do need a paper that is a heavier weight than photocopy paper so it holds its shape. I used construction paper but a light cardstock or something similar would work too.

Glue –

Plain white school glue is what we used but just know that you’ll need to use a bit of patience to give it some drying time. Some of my students found the gluing process frustrating, so I always had scotch tape on hand too.

Embellishments –

These are optional. You can certainly make all of the embellishments from paper and still have a lovely nutcracker soldier. But, we had a fully stocked art supply center and the kids loved adding their own personal creative touches to their soldiers.

Ribbon, googly eyes, pompoms, felt, glitter, sequins, buttons, and other items like that can really be fun!

Black Marker

Scissors

Pencil

Free Template Pattern

Click here to download your free pattern pieces.

Two finished paper nutcracker crafts, one red and one blue, standing upright on a white surface with a black polka-dot sheet.

How to make your paper nutcracker soldier:

Trace and cut out the pattern pieces:

The provided template includes patterns for the body base, head, hair, moustache, hat, arms, hands, and accessories. Trace the patterns on the selected papers using a pencil and cut them out.

Pink rectangle with beige side triangles and small beige cheek shapes glued on to form the nutcracker’s face.

Attach the hair and moustache:

Attach the hair cutouts on both sides (left and right) of the head cutout and attach the moustache cutout 

Black nutcracker hat with yellow trim and yellow decorative shapes positioned above the unfinished nutcracker face.

Start creating the hat:

Attach the strip cutout along the bottom side of the hat base and attach the 3 teardrop shapes on the hat as you like.

Nutcracker face with mustache and sideburns attached as the decorated black hat is aligned for gluing.

Finish the hat:

Attach the hat pattern on the top side of the head pattern.

Finished nutcracker head with drawn facial features, including closed eyes, nose, and mouth.

Draw the face:

Use a black marker to draw the face of the papercraft nutcracker doll.

Long black paper strip with a yellow square buckle glued in the center to form the nutcracker’s belt.

Create the belt:

Cut slits along the marked lines inside the buckle cutout. Insert the belt string through the slits to make the papercraft belt.

Large curved red paper piece attached to a black strip to form the nutcracker’s body base.

Attach the trousers:

Attach the trousers cutout on any one side of the base cutout.

Red and black nutcracker body with belt attached and six yellow circle buttons glued in two rows.

Finish the belt, buttons, and trousers:

Attach the belt pattern along the top, inner side of the trouser part. Attach the 6 decorative button cutouts on the suit part of the base.

Assembled nutcracker head glued onto the decorated red and black body with buttons and belt.

Attach the head:

Attach the head pattern right above the top pair of buttons, on the base.

Rolled red paper tube with a pink end and yellow cuff forming one arm of the paper nutcracker.

Start making the sleeves:

Attach the strip cutout along any one side of the sleeve cutout and attach the hand cutout to the opposite side of the sleeve.

Rolled red paper tube with a pink end and yellow cuff forming one arm of the paper nutcracker.

Roll the sleeves:

Roll the sleeve pattern to form a cylinder shape.

Two completed nutcracker arms made from rolled red paper tubes with yellow cuffs and pink hand ends.

Attach the tops of the arms:

Attach the round cutout to the top end of the cylinder shaped arm pattern.

Paper nutcracker body rolled into a cylinder with buttons, belt, and head attached at the top.

Create the main cylinder:

Roll the base pattern to form a cylinder shape as well.

Completed paper nutcracker with both arms attached to the sides of the cylindrical body.

Finish assembling the soldier:

Attach the arm patterns on both sides of the base cylinder shape to complete the craft. 

From here you can add any embellishments you want, if desired.

A pair of paper nutcracker soldiers, one in red and one in blue, standing side by side on a white background with a polka-dot sheet in the corner.

More nutcracker themed crafts:

  • Paper bag nutcracker puppets
  • Craft stick nutcracker
  • Nutcracker paper chain countdown calendar

Find the story of the nutcracker here.

Get more adorable craft ideas like this along with delicious easy meals and fun holiday celebrations by subscribing to our newsletter. We often send out free printables in these as well, just for our email subscribers.

Tall Pinterest graphic showing two paper nutcrackers with the text “Paper Nutcracker Craft” in blue and red header banners.
Pinterest image with two paper nutcracker crafts and a red label reading “Easy Tutorial” under the header “DIY Paper Nutcracker.”
Pinterest graphic showing a close-up of red and blue paper nutcrackers with the text “DIY Paper Nutcracker” on a torn red banner.

Previous Post: « Snow Globe Charcuterie Snacks
Next Post: Almond Buttercrunch Candy »

Reader Interactions

Comments

  1. Jenny says

    November 27, 2018 at 7:05 am

    Your nutcracker is so cute! That’s awesome you used a can. Love it!

    Reply
  2. Rachel says

    November 27, 2018 at 2:46 pm

    This looks like a fun and easy craft!

    Reply
  3. Beverly says

    November 28, 2018 at 7:25 am

    What a fun craft to make with kids! I started a nut cracker collection about 20 years ago. My daughter or husband give me a large one each year and I have lots of small ones, too. I want to try this craft with my granddaughter. She’ll love it.

    Reply
  4. Super Mom - No Cape! says

    November 28, 2018 at 3:16 pm

    What a cute little paper nutcracker!

    Reply

Leave a Reply Cancel reply

Your email address will not be published. Required fields are marked *

Recipe Rating


This site uses Akismet to reduce spam. Learn how your comment data is processed.

Primary Sidebar

Welcome to Creative Cynchronicity! 
Learn more about me here! 

Creative Cynchronicity is a participant in the Amazon Services LLC Associates Program, an affiliate advertising program designed to provide a means for sites to earn advertising fees by advertising and linking to Amazon.com and Amazon.ca.

Crocheted Sunflower Granny Square

Two granny squares with a sunflower in the center of each. Sunflower is golden yellow with a dark brown center. On one square, the flower is surrounded by white and on the other it's surrounded by blue.

Archives

Copyright © 2026 Creative Cynchronicity - All Rights Reserved · Privacy Policy