Get ready for a hoot of a good time with this adorable Moving Owl Craft! This hands-on paper craft is perfect for kids of all ages from preschoolers who love playing with colorful paper to older kids eager to try a simple moving-mechanism project.
With just a few basic supplies, you can create a sweet owl whose wings flap when you push or pull a popsicle stick. It’s part art, part engineering, and 100% fun! Great for rainy days, classroom projects, or nature-themed lessons about birds, this moving owl is sure to delight.

Moving Owl Craft – Kids Paper Craft
Approximate prep time: 10 minutes (if cutting out pieces ahead of time)
Approximate crafting time: 20-30 minutes depending on how elaborately decorated you want your owl to be
Why You’ll Love This Craft
- Great for All Ages – Simple enough for ages 5+ but engaging for older kids too; younger ones may need a bit of grown-up help.
- Interactive & Fun – The moving wings add a playful twist kids can’t resist.
- Encourages Creativity – Kids can choose their own colors and decorate their owl.
- Fine Motor Skills – Cutting, gluing, and assembling help develop hand-eye coordination.
- Budget-Friendly – Uses inexpensive and easy-to-find materials.
- Customizable – Make your owl realistic or whimsical with fun patterns and shades.
- STEM Connection – Introduces cause-and-effect and basic engineering as kids make the wings flap; pair with free STEM activities from Science Buddies or Invent.org.
Supplies for Your Moving Owl Paper Craft:
Get everything ready before you start. Here’s what you’ll need to make this flapping wing owl craft:
- Colored cardstock (for owl’s body base)
- Colored craft paper (for details like wings, face, beak)
- Pencil
- Craft glue
- Scissors
- Brad pins (paper fasteners)
- Sharpies or markers
- Sticky tape
- Popsicle stick
- Stretchy string or elastic thread
- Printable owl template (download link here)

Get simple craft ideas, delicious easy recipes, and fun holiday celebration ideas by subscribing to my newsletter! I often send out free printables in my emails as well, just for email subscribers.
Step-by-Step Instructions for Making a Moving Owl Craft:

Step 1:
Download, print, and cut out the owl template pieces. Trace the body on colored cardstock and the remaining parts on thick colored craft paper. Cut them out.

Step 2:
Draw the eyes on the face cutout with Sharpies or markers.

Step 3:
Glue the face piece onto the top of the body base.

Step 4:
Glue the beak just below the eyes.

Step 5:
Attach the legs to the bottom of the body base.

Step 6:
Make two small holes in each wing as shown in the template.

Step 7:
Place a wing on one side of the body, rounded edge facing out.

Step 8:
Use a brad pin to attach the wing to the body through the hole nearest the edge.

Step 9:
Repeat on the other side for the second wing.
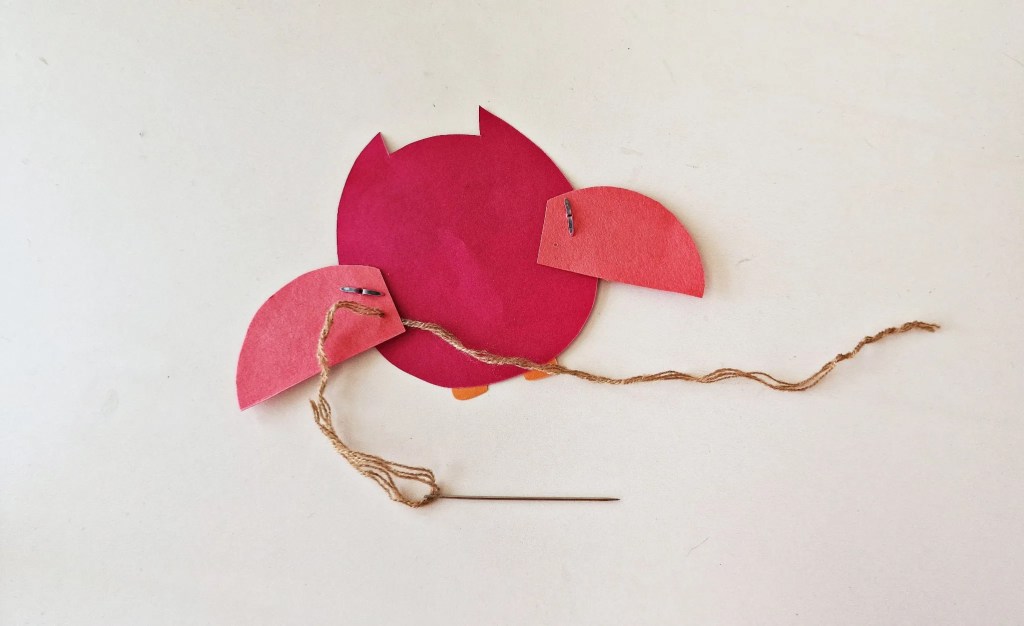
Step 10:
Cut a length of stretchy string. Thread it through the second hole in the first wing from the inside.

Step 11:
Thread the other end of the string through the second hole in the opposite wing, again from the inside.

Step 12:
Tie knots at both ends of the string while the wings are slightly open.

Step 13:
Attach the center of the string to a popsicle stick using sticky tape.

Step 14:
Push the stick upward — the wings close.

Step 15:
Pull the stick downward — the wings open.

Troubleshooting Your Moving Owl Craft
The wings don’t move smoothly
- Make sure the brad pins aren’t too tight. They need to be snug enough to hold but loose enough for the paper to pivot.
- Check that the holes for the brads are clean and round; jagged holes can catch on the paper.
The string keeps coming loose
- Tie double or triple knots and secure them with a small dab of craft glue before trimming the ends.
- You can also tape over the knots on the inside of the wings for extra hold.
The popsicle stick isn’t moving the wings evenly
- Confirm the string is the same length on both sides and is centered on the popsicle stick.
- If one wing moves more than the other, adjust the knots until the tension is equal.
The paper bends or tears
- Use heavier cardstock for the body and wings.
- Reinforce the holes with small pieces of tape or paper reinforcements before attaching the brad pins.
Helpful Tips & Variations
- Add Personality – Use googly eyes instead of drawing them.
- Patterned Paper – Try scrapbook paper for a textured or patterned owl.
- Seasonal Fun – Make snowy owls in winter or bright tropical colors in summer.
- Learning Extension – Pair with a book about owls or a nature documentary.

Frequently Asked Questions About the Moving Owl Craft
What age group is this moving owl craft suitable for?
This craft is great for kids ages 5 and up with some adult supervision for cutting and using brad pins. Younger children can still enjoy decorating the owl while an adult assembles the moving parts.
Can I make this moving owl craft without brad pins?
Yes! If you don’t have brad pins, you can try small paper fasteners, split pins, or even sewing the wings in place with yarn. You can even use a piece of pipe cleaner (chenille stem) and button instead of the brads. The key is to allow the wings to pivot. This video shows you how to make DIY brads if you’d like to do that instead .
What type of paper works best for the owl’s body?
Sturdy cardstock is ideal for the body because it supports the moving mechanism without bending or tearing easily.
How can I make the moving owl craft more durable?
You can laminate the body and wings before assembling, or use double layers of cardstock to strengthen the parts.
Can I turn this into a classroom or other group activity?
Absolutely! Pre-cutting the template pieces can make the process quicker for a large group. It’s a fun project for art class, nature lessons, or rainy-day indoor activities.
How do the owl’s wings move?
The wings are attached with brad pins and connected by a stretchy string that’s taped to a popsicle stick. Pushing or pulling the stick makes the wings flap.
Can I use this owl craft for a lesson about birds?
Yes! This craft pairs perfectly with lessons on owl habitats, bird anatomy, or nocturnal animals. Kids can decorate their owl to look like real species or create a fantasy bird. You can find more ideas about teaching your kids about birds here.

This Moving Owl Craft is more than just a cute paper project. It’s a chance for kids to explore creativity, basic mechanics, and storytelling. Imagine the adventures your owl could have!
If you make this craft, I’d love to see it. Share your creations on social media and tag me @CreativeCynchronicity on Facebook or @creativecynchro on Instagram so I can cheer you on.
Looking for more fun nature-themed crafts? Check out my Craft Stick Narwhal, Toilet Paper Roll Octopus, or Paper Jellyfish for more creative fun.
And if your kids want more moving crafts, try these: Moving Caterpillar and Moving Rocket Craft.
For additional STEM/STEAM related activities, check out Crystallized Snowflakes and Craft Stick Catapults.

Love this craft? Pin it for later!
Save this Moving Owl Craft to your favorite kids’ activities board so you can come back to it anytime you need a fun, creative project. It’s perfect for rainy days, classrooms, or nature-themed lessons and those flapping wings are always a hit!


Leave a Reply