Welcome to the 2017 Ornament Exchange & Blog Hop! This year, there are 47 amazing bloggers participating in the exchange. The rules of the challenge were simple: be partnered with a fellow blogger, create a handmade ornament for $15 or under, create a tutorial, and ship the ornament off to a new home! Being a longtime fan of paper quilling, I decided to put together a simple but elegant paper quilled ornament for my partner. The design is my own and I had a wonderful time coming up with it.
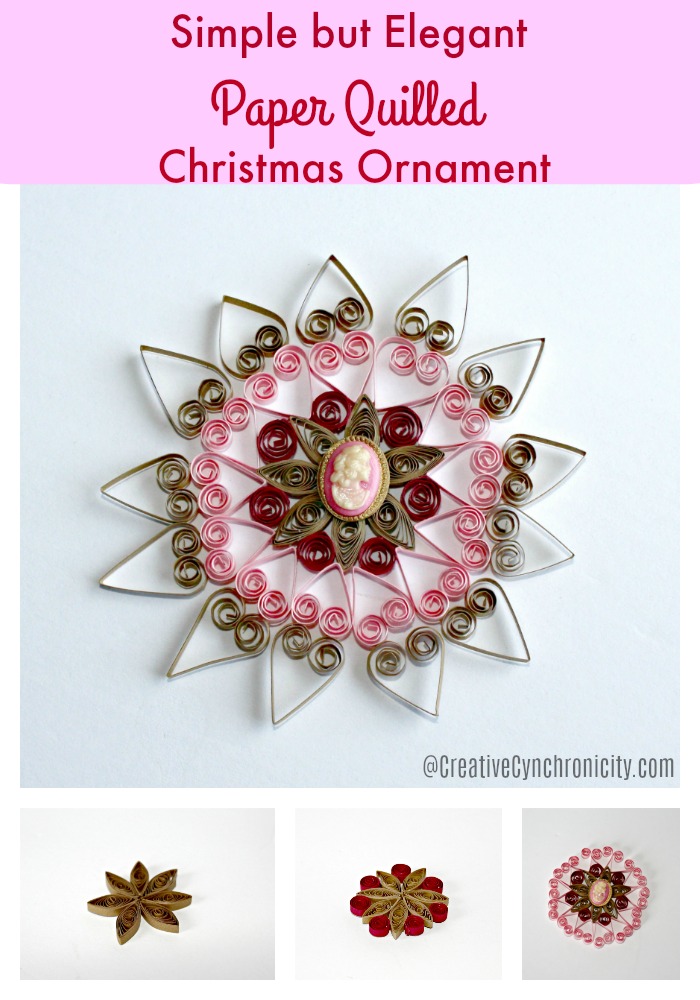
I’ve been paired up with Molly of Just a Little Creativity. Molly and I were well-suited to be partners as we have similar tastes. She likes vintage, shabby chic items in traditional Christmas colours or in teal, pink, gold, or white. I think that the delicate filigree patterns of paper quilling lend themselves well to a vintage, shabby chic look and I hope that she enjoys it!

Meet the 2017 Ornament Exchange Hosts
Erlene ⋅ My Pinterventures Kim · Made In A Day Pili ⋅ My Sweet Things
Amanda · The Kolb Corner Shirley · Intelligent Domesticatons
Michelle · Our Crafty Mom Beverly · Across the Blvd. Cindy ⋅ DIY Beautify
Christene · Key to Inspiration Nicki · Sweet Parrish Place Katrin ⋅ Kreativ K
Megan · C’mon Get Crafty Hilary · Raising Fairies and Knights
Emily · Two Purple Couches Tina · One Crafty Mess Marie · The Inspiration Vault
Debra · Shoppe No. 5 Trisha · Rosewood and Grace Jeanie · Create and Babble
Terri · Christmas Tree Lane Maureen · Red Cottage Chronicles Toni ⋅ Small Home Soul
Ula ⋅ Lulu & Celeste Sue ⋅ A Purdy Little House Pamela · Home On The Corner
Lorelai ⋅ Life with Lorelai Debbie ⋅ Tweak and Style Stephanie ⋅ Swoodson Says
Chelc ⋅ Inside the Fox Den Susan ⋅ Super Mom – No Cape! Molly ⋅ Just a Little Creativity
Roseann ⋅ This Autoimmune Life Angela ⋅ Simply Beautiful by Angela
Vicki and Jenn ⋅ 2 Bees in a Pod Joanne ⋅ Our Unschooling Journey
Tylynn ⋅ Bitterroot DIY Sam ⋅ Raggedy Bits Mary ⋅ The Boondocks Blog
Cyn ⋅ Creative Cynchronicity Dione ⋅ Clever Chameleon Quilting Erica ⋅ Erica Ever After
Chelsea ⋅ Love Paper Crafts Evija ⋅ From Evija with Love Anne ⋅ Orange Bettie
Samantha ⋅ Little Bits of Home Hope ⋅ Hopes Crafty Niche Pam · P.S. I Love You Crafts
To make your own paper quilled Christmas ornament, you’ll need:
- quilling paper, 1/8 inch wide. I used 5 – 18 inch strips of gold, 4 – 12 inch strips of pink, and 2 – 12 inch strips of burgundy.
- scissors – I like to use small scissors and for some sections, I like to have a pair of manicure scissors on hand.
- white glue – my favourite is Aleene’s Tacky Glue.
- a slotted quilling tool – some people simply quill around a needle or something similar but with my arthritic hands, I need a handle. I also find that the slot helps hold the paper in place and there’s less slipping. This makes for a more precise coil.
- a quilling ruler – this not only has measurements on it like a typical ruler, but it also has circles that allow you to make consistently shaped and sized coils for your design
- a quilling board and some straight pins – not a necessity but really hand for assembling your shapes and holding them together while the glue dries
- a quilling glue spot or waxed paper – you want something you can place your shapes on to glue them that won’t then tug on the paper (and perhaps rip it) or stick to the shapes when you pull them away. Waxed paper is very handy because it’s translucent. You can place a pattern under it and you will be able to see it through the paper to form your quilled art.
- toothpicks – I use these to apply the glue. Too much glue can make things look gloppy and messy. This allows me to be more precise.
- clear fishing line – to hang the ornament with
Paper Quilling Christmas Ornament Tutorial Instructions:
This pattern is made up of 3 simple shapes. To copy mine exactly, you will need 7 gold marquise, 7 burgundy coils, 13 pink hearts, and 13 gold hearts.
I begin by tearing the pieces of quilling paper into the required lengths. Tearing is desirable because the little fibers of paper it leaves behind on the torn edges helps the glue to hold better. If you aren’t comfortable with this, you can certainly use the scissors instead. You just may need to hold the shapes a bit longer to ensure that the glue is secure.
For this project, I used:
- Gold – 7 pieces – 3 inches long and 13 pieces – 3.5 inches long
- Burgundy – 7 pieces – 3 inches long
- Pink – 13 pieces – 3.5 inches long each
Next step is to create the basic shapes:
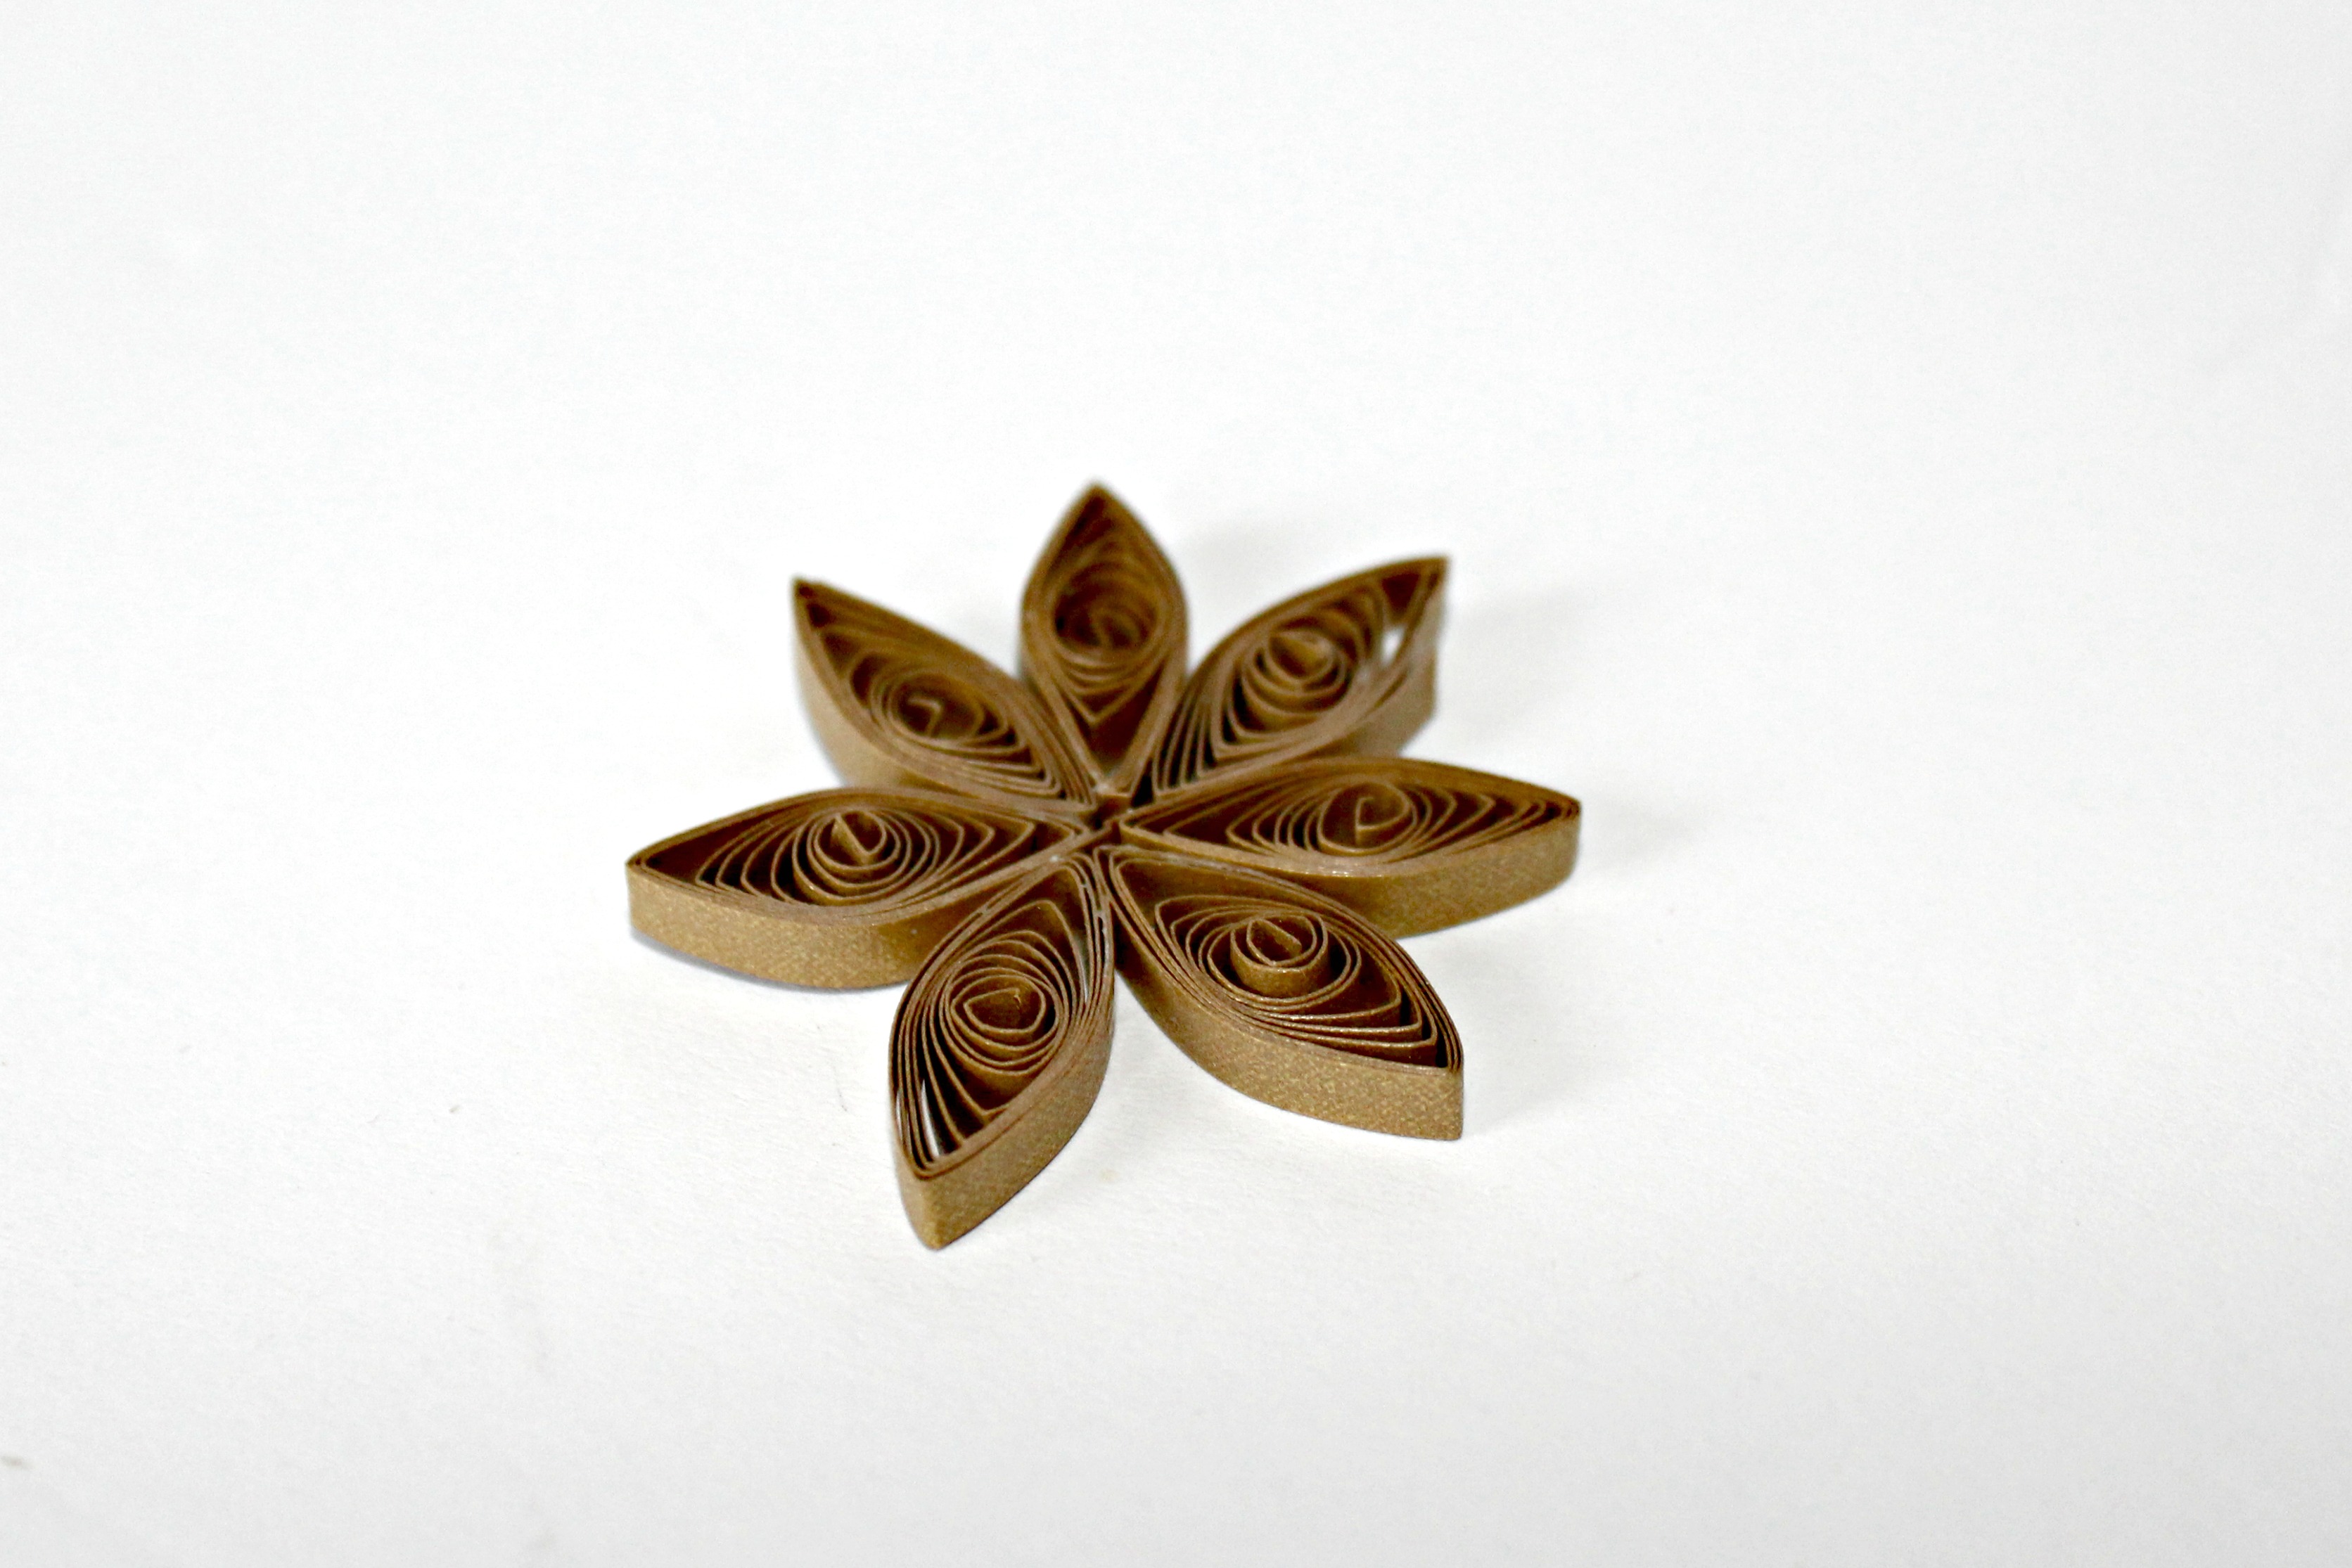
Marquise shape –
The marquise is also known as the eye shape. Begin by making 7 gold coils. Make the coils by inserting one end of the paper strip into the slot of the tool. I twirl the tool with my right hand while the finger and thumb of my left hand keeps the paper coiling against the tool. My coils were each approximately 1/2 inch in diameter. This is where the ruler can come in handy. It has circles in it of various sizes. Make your coil and place it in the appropriate circle. This helps assure consistency of the coils.
While the coils are still in place in the ruler, I use a tiny dab of glue applied with a toothpick to secure them. Let them dry well. Remove a coil from ruler and give it a pinch. I always pinch right where the coil has been glued. I just find that it really helps to secure that connection. Your coil should now look like a teardrop. Pinch again opposite where you made the first pinch to create the marquise or eye shape. Repeat 6 times.
You can now glue the 7 marquise shapes together as shown in the photo above or save all of the assembly for the end. I like to do it at this point because while it dries, I can be working on the next set of shapes.

Coil shape –
This is just as simple as it sounds. You need 7 burgundy coils. My coils were roughly 1/4 inch in diameter. Once the glue is dry (it doesn’t take long), you can add the coils to your ornament base. Glue one coil in between each pair of marquise shapes.
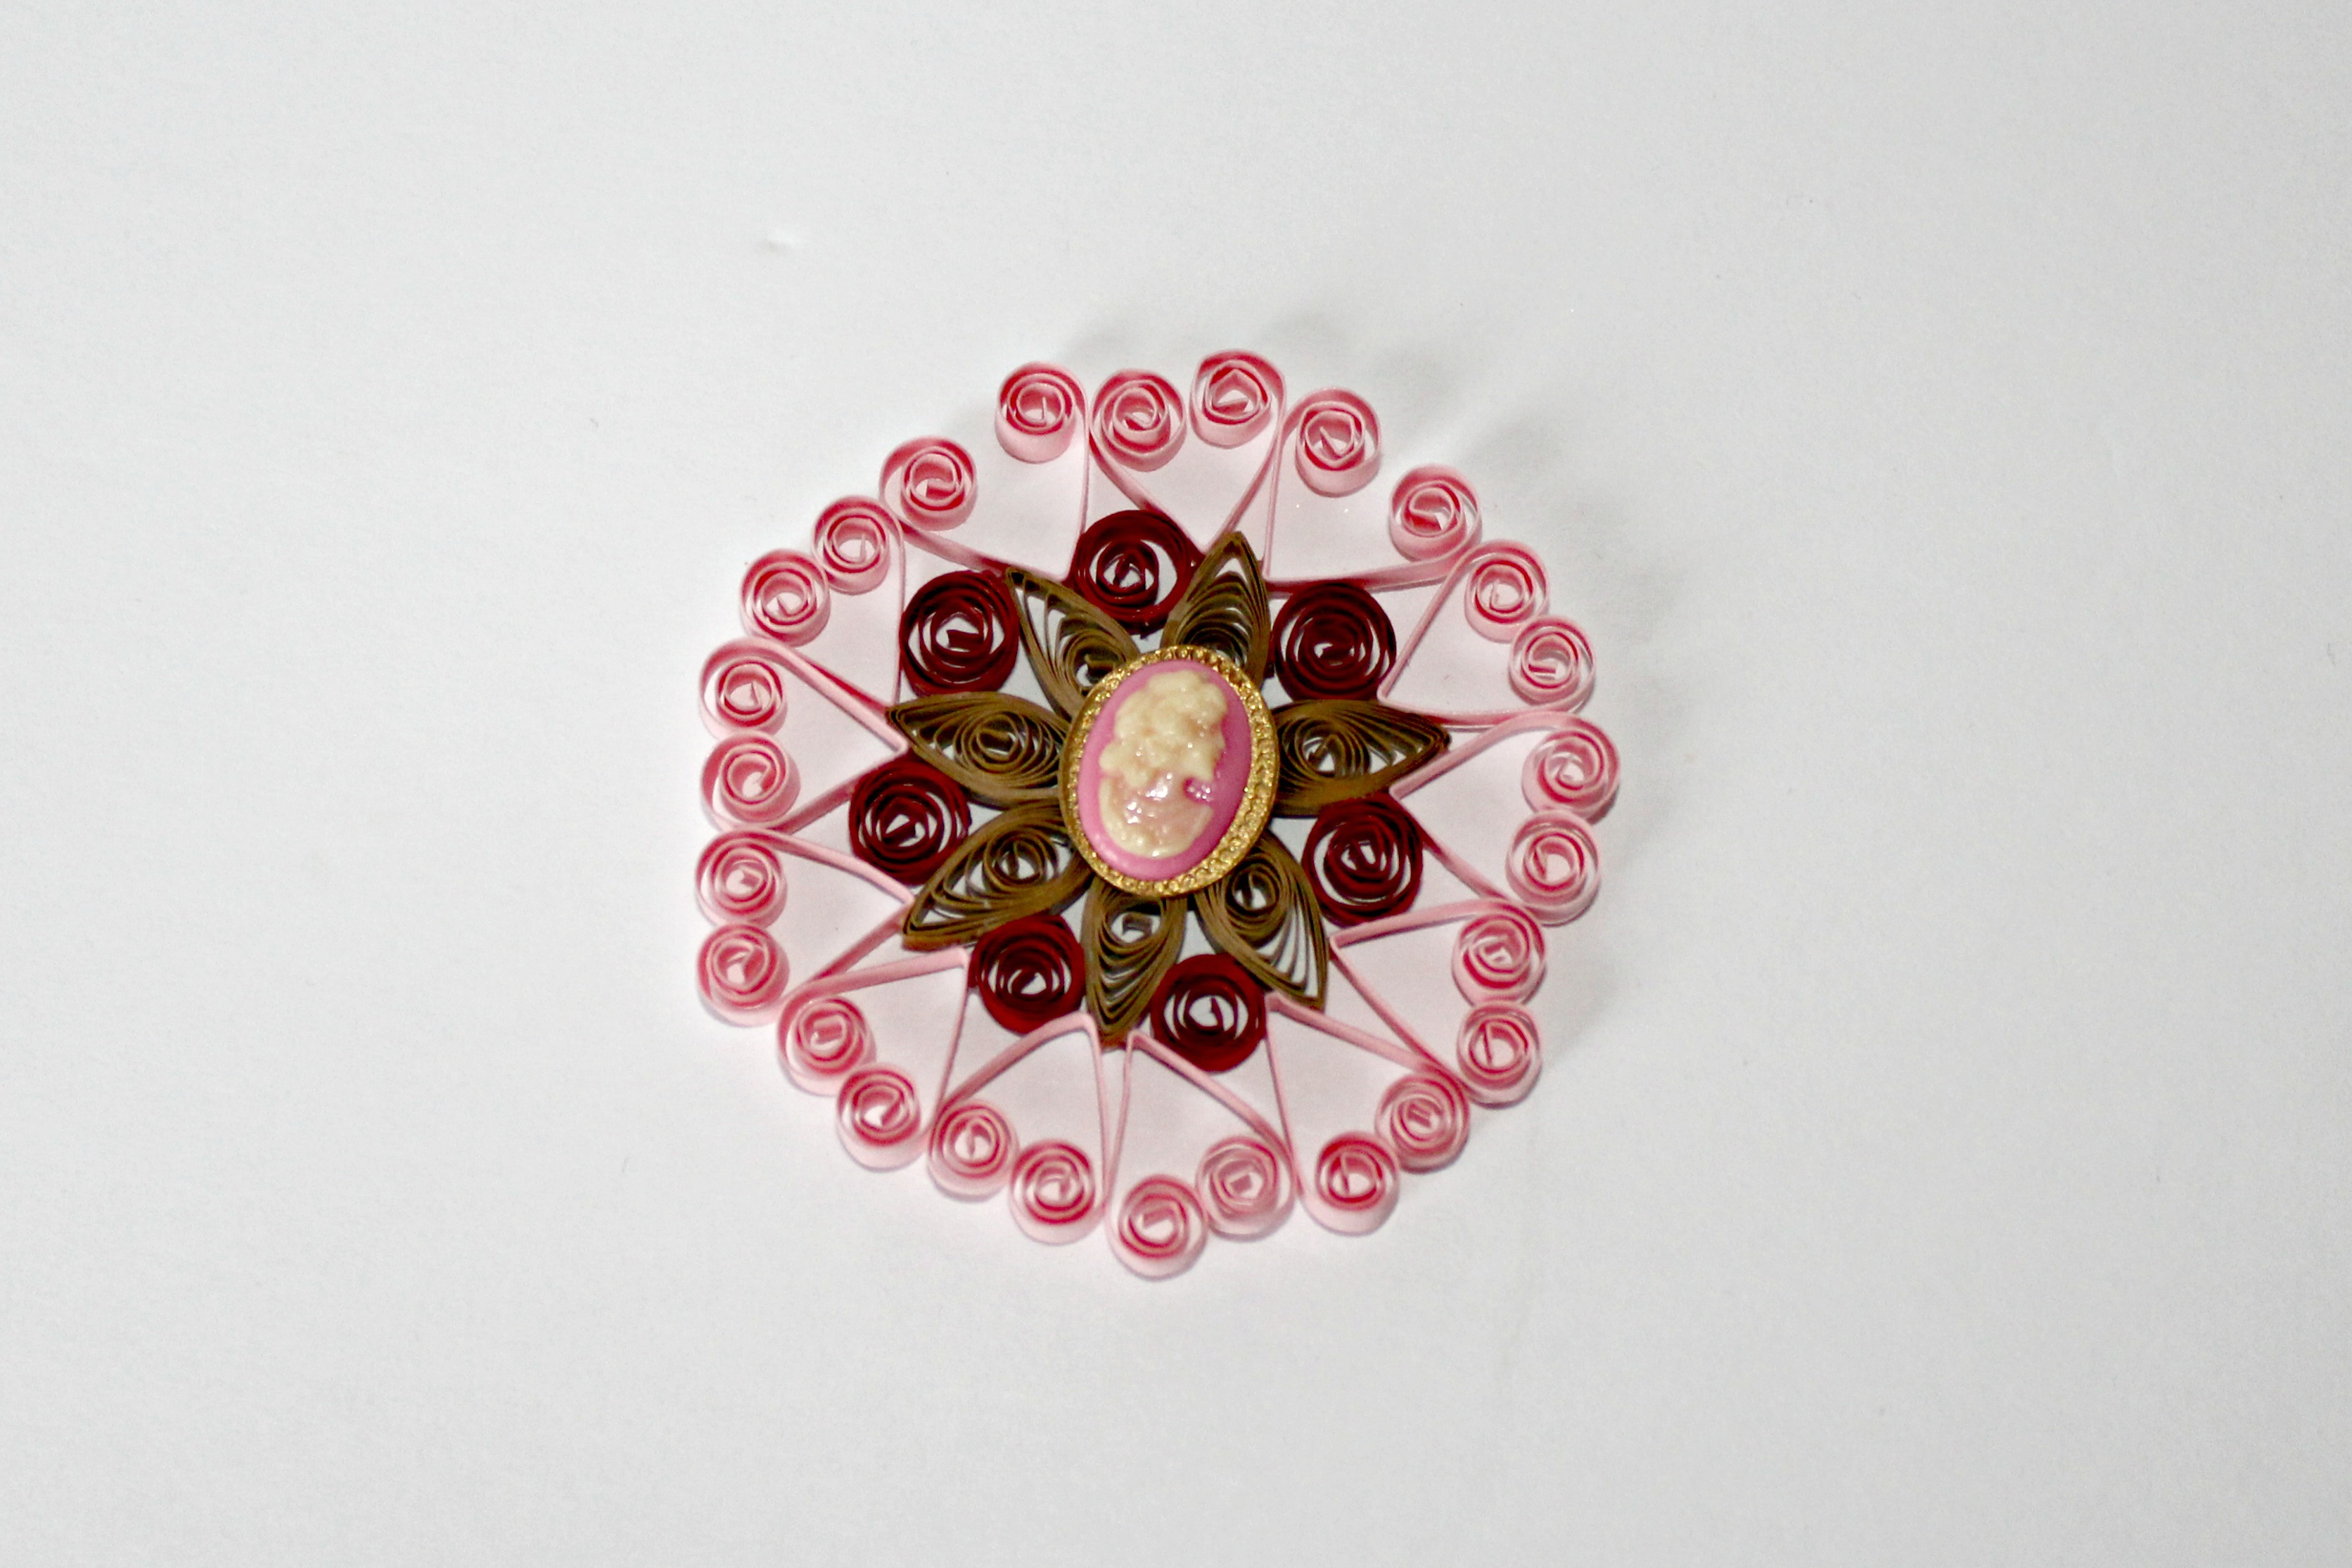
Heart shapes –
To make the heart shapes, begin by folding each pink strip in half. The fold forms the point of the heart. Coil in from one end of the paper strip towards the fold about halfway. Then coil in from the other end of the paper strip towards the fold about halfway. This is the trickier of the shapes simply because you are trying to get the coils even with each other so you don’t end up with a lopsided heart.
This is one of the quilling shapes where glue is not generally used. You can add a dab where the coils meet if you feel it’s necessary but I wouldn’t do this until your ornament is completed. As you can see in the photo above, mine wouldn’t have fit appropriately into the ornament if I had glued them. Glue each heart to one side of each coil as shown above.
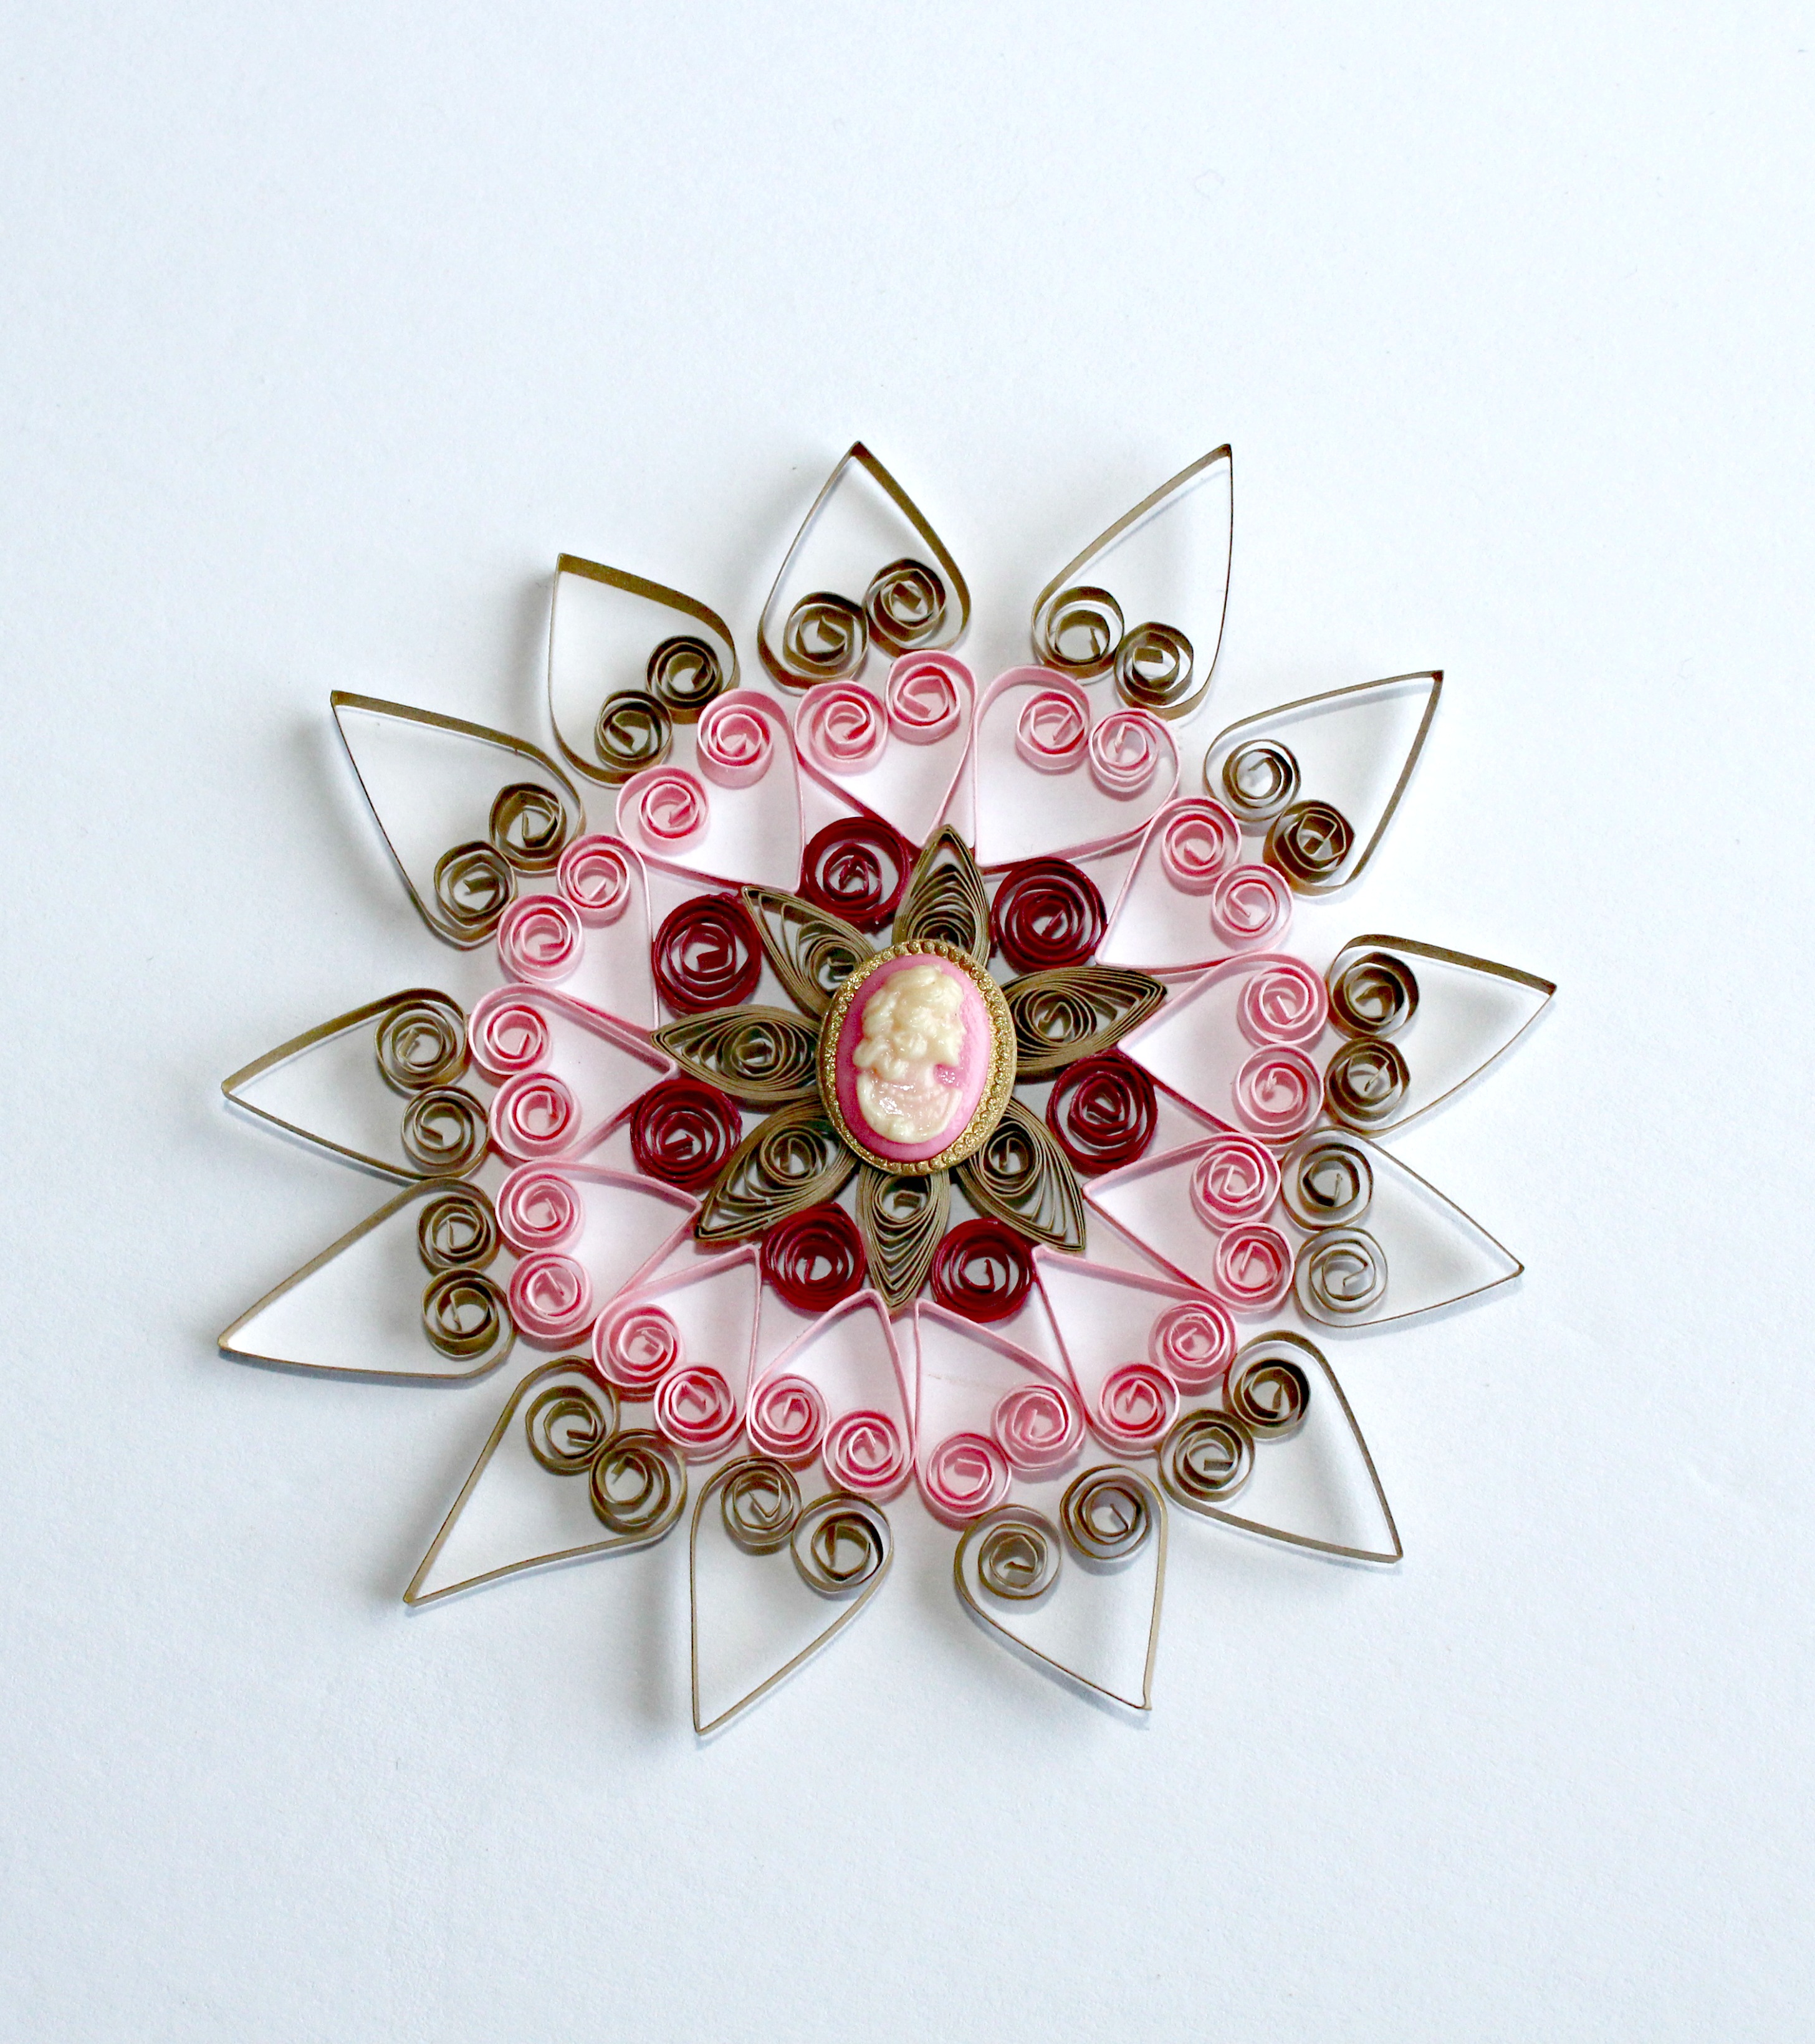
Now, make another batch of heart shapes using the gold strips. Each gold heart gets glued to a pink heart – “bumps” of the hearts together as shown in the photo.
And that’s it! Add a hanger for the ornament – I like clear fishing line so it doesn’t really show – and display on your tree. Pretty, delicate, and old-fashioned. I sure hope that Molly likes it!
FIND ALL 47 HANDMADE ORNAMENT TUTORIALS BELOW AND SHARE YOURS TOO! Use Hashtag #2017OrnamentExchange so we can see your creations on social media.
Claudia says
Cute!!! These remind me of wooden shaving/curl ones my dad used to make when I was young ❤️
Debrashoppeno5 says
How gorgeous these are. The detail is amazing. They will look so beautiful on the tree.
Randa @ The Bewitchin' Kitchen says
The Marquise shape is my favorite! It’s so pretty!
Super Mom - No Cape! says
Paper quilling is one of the few crafts I’ve never tried. The ornament you made is beautiful!
Erlene says
I’ve never tried quilling before. It looks a bit time consuming, but it sure creates a beautiful design. Thanks for sharing your ornament tutorial on the ornament exchange. I hope you had fun.
GiGi Eats says
Wow! I am so NOT creative like that, hahhahaha! More power to you – these are awesome!
Choice Furniture Superstore says
These are simply beautiful. I just love these paper quilled ornaments for Christmas. They are looking pretty.
Emily says
This is beautiful! I am always in awe of paper quilling projects – they look so delicate.
Colleen Meganck Aben says
Hi! I’m just starting to get into quilling and love your snowflake ornament. What do you use to seal and secure the final ornament. Would a mod piece type spray be best?
Cyn Gagen says
I often don’t use a sealant at all. They are stronger than you might think and usually hold up fairly well. Sometimes though they get a bit misshapen or if not packed away really well so that something doesn’t squish them, I have had to remake one once. However, for ones I do want to seal, I always use a spray sealant. Plaid makes one that I like and I’ve also had good luck with the Krylon clear spray. Use a light hand – apply a light coat and let it dry well. Add more then if you need too. Too much sealant all at once can actually be worse than no sealant at all because it can dampen the paper too much and cause it to “warp”. Hope this helps!