I plan to do some more Koolaid dyeing but found a box of Easter egg dyes that I bought on clearance last year and decided to try them out first. I had heard of people having good luck with these dyes as well and I wanted to see if there was any substantial difference between the Koolaid and the egg dyes. The Easter egg dyes that I had were called gel dyes. They seemed more liquid than gel with each colour coming in a little packet – like the type you get condiments in at a fast food restaurant.
The End Result
I decided for this experiment to use 100% pure wool yarn and to try making variegated yarn as per Leethal blog. The blog advised buying the yarn in a skein not a ball but I had enough trouble simply finding 100% wool period so I had to buy it in a ball. I unravelled the ball and wound it around a piece of cardboard to make more of an open skein.
Wool Soaking in Water
I began by soaking the yarn in water to get it fully saturated and more accepting of the dye. I placed it in a large pot of really warm water (with a tsp. of vinegar added – I don’t know if this is truly necessary but it does seem to help the dyes to set) and allowed it to soak for about 45 minutes.
Adding the Dyes
Once soaked, I placed the pot on the stove and turned the heat up to medium high. As the water began to heat up further, I took the packets of dye and squirted a section of the yarn with each colour. Following the advice of the Leethal blog, I tried to keep the colours towards the outer edge of the pan to allow for it to spread towards the middle.
The Wool “Cooking”
Despite adding the colours only towards the outside of the yarn bundle, it still spread quite a bit and the colours bled and blended into each other a bit more than I had expected. I don’t think it’s possible or even desirable to keep it from blending together completely but a couple of the lighter colours seemed to get taken over by the darker ones. I wonder if I tried to use too many colours/too much dye in this one particular pot of yarn. For my next attempt I will cut down on the number of colours I use and see if that helps.
Simmering
When the water heated up, I turned it down to a low simmer. I didn’t allow it to get to an actual boil as I was concerned that this much heat might shrink or break down the wool fibres. I simmered the yarn for about an hour to allow the dyes to sink in and set in the wool.
Cooling Down
Once the yarn had cooled down, I removed it from the pot and placed it in a metal colander. I used my metal one because I was concerned that the dyes might stain my plastic one. I wore my rubber gloves as well ( the Koolaid dyes really stained my skin – especially the reddish ones) but at one point, I had to take them off to deal with our dog and forgot to put them back on and these dyes didn’t stain my skin at all. I still think it would be better to wear them just in case though!
Draining
After the excess water had drained off the yarn, I gently squeezed it to get as much of the moisture out of it as possible. It was interesting to note that when I did the Koolaid dyeing method, the water that drained off of the fabric was heavily coloured with the Koolaid dyes but in this case the water drained clear. I’m not sure what this means about the quality and perhaps colour-fastness of these two different dyeing methods but it was noticeable. The yarn certainly seems as thoroughly and evenly dyed as the fabric and there was less cleanup involved because of it. Perhaps it’s just that the wool absorbs much more of the dye right down into its fibres than the fabric?
The Wool Drying
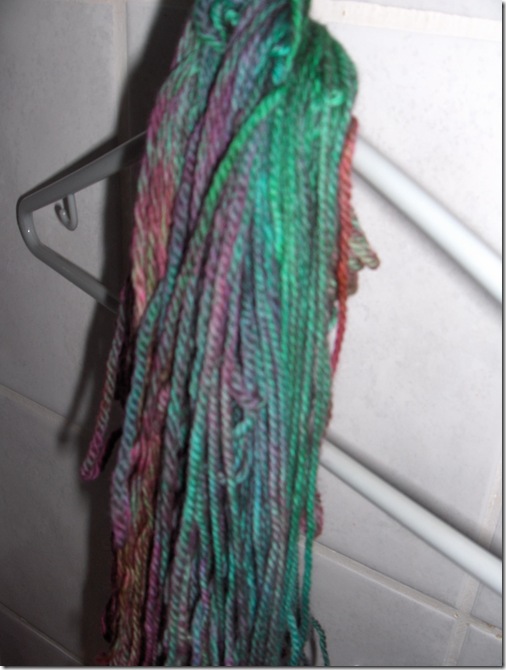
I rinsed the yarn in clear water to ensure that any traces of dye that might be just sitting on the surface were removed. I made sure that the water was lukewarm because the blog I read advised that a drastic temperature change between the room temperature yarn and the water could perhaps cause shrinkage and felting of it. After rinsing, I once again, gently squeezed as much of the moisture out of it as possible and hung the wool from a hanger over the bathtub to allow it to finish drying.
My Yarn Helper
As for the results, I don’t see any discernable difference between the Koolaid and the Easter egg dyeing methods. When I put the egg dyes into the pot, they seemed to be much more intense in colour and I wondered if this would result in stronger shades but they are still the same somewhat muted shades I experienced with the Koolaid dyed fabric.
For some more Koolaid dyeing fun, check out these Easter eggs dyed with it over at Gingerbread Snowflakes!
Update: see the update on this process at Gingerbread Snowflakes.


Thea says
I like the colors. Looks very dragon-fly like. Thanks for sharing your experiment!