Halloween is coming fast and this time of year is just so busy, isn’t it? I’m always looking for fast and easy ways to add some holiday fun to my home. I prefer ones that I can whip up quickly and inexpensively, like this really fun Halloween Ghosts Under Glass craft project.
Halloween Ghosts Under Glass Tutorial
I’ve always loved any type of displays under glass. Perhaps it goes back to my love of science and history and all the museums I’ve spent time in. Or maybe it’s just because I just love glass jars! (Does that sound weird?)
In any case, I had some of these really big jars sitting around and have been wanting to use them for something fun. So I decided to make some kind of Halloween display with them.
Here’s what you’ll need to make them:

I got these jars from a local restaurant. Of course you could use jars you find at dollar stores, Walmart, Target or other such stores but these were free!
Ask your local restaurants and you might be able to score some too. They’re used for things like pickles, olives, and salad dressings. If not, I had the best luck finding large but inexpensive glass jars in the kitchen department at Walmart.
Besides the jar, you’ll need:
- some Styrofoam balls
- a twig
- some cheesecloth (scrap cloth will work too but I love the way the cheesecloth drapes so easily)
- a Styrofoam disk or some floral foam (check the floral department – it’s often cheaper than the craft department)
- some moss
- and a few things you’re likely to have on hand like a black marker, scissors, and glue (I used Aleene’s Fast GrabTacky Glue).

Instructions:
I found that I was able to balance the twig and ghosts really well inside the jar. So, I didn’t need to glue the foam into the lid. You might find you’ll need a touch of glue to hold it in place.
If you don’t want it to be permanent, you could also use some double sided tape. Try the kind made by Command Adhesive so that they’re easily removed when ready. I did put a dab of glue on the end of the twig before I stuck it into the foam though to make it more secure.
 You can either attach the foam ball to the twig and then form the ghost over it or make the ghost first and attach it the twig after. Again, I added a dab of glue onto the end of the twig before inserting it into the foam ball.
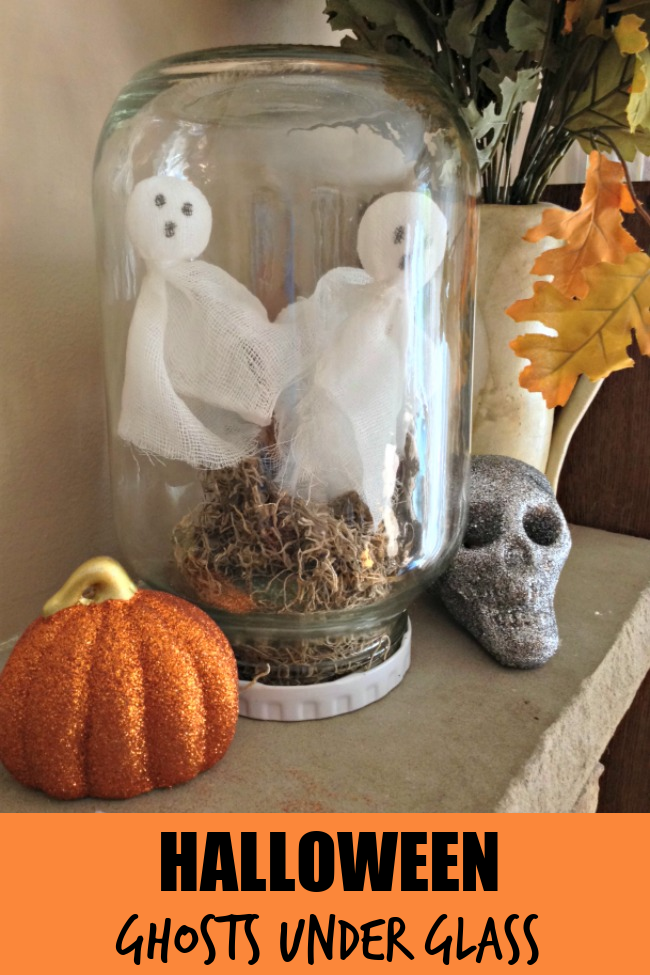
 Making the ghosts is as easy as cutting a piece of cheesecloth and placing it over the foam ball. I found I preferred a double thickness of the cloth to make it still look gauzy and sheer but without having the foam show through.
I used a strip of cheesecloth to tie around the ghost’s “neck” as it blended in better with the rest of the ghost than using twine or yarn would have – plus it saves on supplies!


Oh the glare – it made me crazy! I photographed in multiple places, multiple times of days, on several different days to try to get you the best images I could. I think you get the idea though!
Now it’s time to put it all in the jar. You can glue the moss to the foam disk before placing it in the jar but I just stuffed some in there to cover it up. That’s it! You’re ready to display your ghosts under glass!
I’ve decided that I’m going to add another twig because it’s hard to see much of it and I really like the looks of a “tree” showing. I’ve also decided it needs a bat hanging down – just for that one last touch!
That’s it. Quick and easy and makes for a really fun spooky touch on my mantel. If you make this, I’d love to see yours too!
Angie @ CCC says
Great idea Cyn!! Thanks for joining!
Carolina says
I love how this turned out! Such a cute decor piece!